Unreal Engine Composure Compositing
- L K
- Apr 25, 2022
- 4 min read

Updated: Apr 26, 2022
I've listed an explanation/tutorial of how to set up a Composure shot below, detailing the issues I encountered on each step.


The Composure Window is found under 'Window - Composure Compositing'
Right click in this window to create a new Comp

Select a Media Plate - this will allow the use of a video file in the composition, which will be our greenscreen footage.

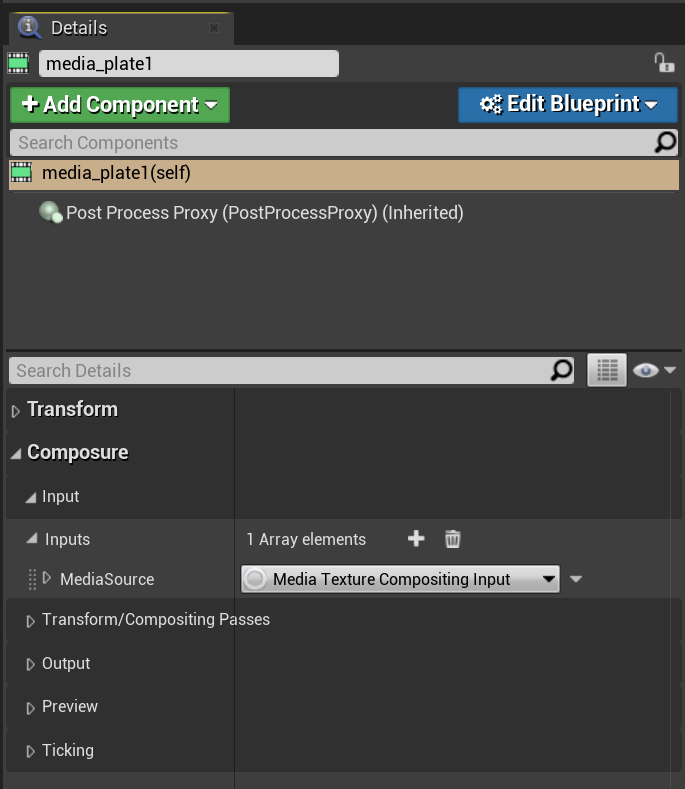
The details pane of this media plate is where most of the changes are made in the compositing and generally how you add effects to the footage.
Expand the composure inputs pans of the media plate out to it's maximum extent.

Right click the content browser and add 'Media Player'. You will get a prompt to add a 'Media Texture' since once doesn't exist. Accept this prompt.
If there is no prompt, manually add a 'Media Texture' in the same way.

Now add the greenscreen footage, again by right clicking in the Content Browser.
Note: .mov files do not play.
I experimented with using by pre keyed/rotoed footage, using .mov since it can support an alpha channel.
.avi files with transparency would work, but there would be quality loss due to compression.
Open the Media Player and double click the imported footage. It will then start playing, make sure 'Loop' is checked and minimise the window.


Reselect the media plate and drag the Media Player into the 'Media Source' slot found in the Composure section expanded earlier.

At this point effects can be applied to this greenscreen footage.
Further down in the details panel is the 'Transform/Compositing Passes' section. This is where effects are applied.
Expanding the 'Chroma Keying' panel allows you to add an array element to the 'Key Colors'. Colour pick green.

Use both sliders to dial in the keying to remove as much background detail as possible without damaging the subject. There are some advanced sliders in the 'Material Parameters' section further down if fine adjustment is required.

Use the same principles to add a despill pass, this should eliminate the green edges/tinting from the greenscreen footage.

The next stage is adding the background camera and combining the footage.
Return to the composure window, right click the media plate and 'Add Layer Element'

Add a 'CG Layer'

Reselect the media plate, and add a new array element to the 'Transform/Compositing Passes' section.
This is where the footage is combined using this Material slot that's been created.

Add a new material from the Content Browser.

Change the material type to 'Post Process'.
Further down in this panel also enable 'Output Alpha'

The next stage is to add both our camera (cg element) and our greenscreen video (media plate) to this material so they can be combined

Add a new node by right clicking and search for 'TextureSampleParameter2D'
Create two of these nodes - one called 'media_plate1' and the other 'cg_element1'.
These are the default names from earlier, and are not required to match for the compositing to work.
Add a further 'Over' node and plug the RGBA nodes into the A and B slots, with the RGBA node plugged into the Emissive Color of the material.


Now return to the media plate, and drag this new material into the Material slot created earlier.

Because we used the same names in the material, it should automatically fill out the 'Input Elements' correctly. These can be changed in the dropdown boxes.
In my case I had to select cg_element1.
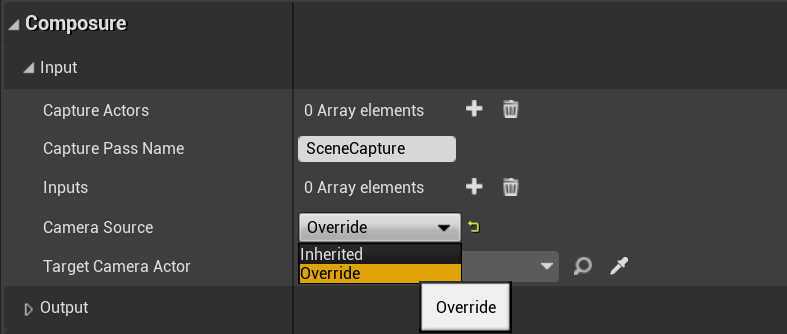
If cg_element1 is not showing a camera, or is showing an incorrect camera, this can be changed in the details panel of the cg element in the Composure section.
I needed to override the Camera Source and select the correct camera in 'Target Camera Actor'.

Everything should now be working properly. If there are still issues, then 'Linear color space only' needs to be selected instead of 'Disabled' in the Project Settings.
This will require a restart and a lengthy compiling of shaders.

The 'finished' product
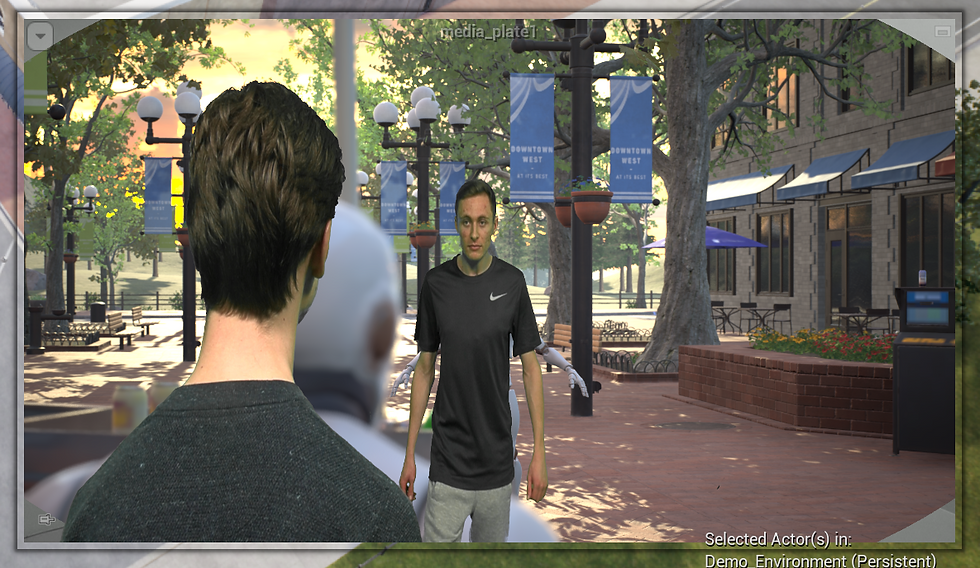
There are some obvious issues with this image. The greenscreen footage is stretched (this is because I cropped the top of the footage to remove the ceiling) - it's not the same aspect ratio.
The previz mannequins are still present - these actors need to be not be rendered.
And my subjects are on the same layer. They need to be separate elements with the cart in-between.
Below is my failed attempt to combine 4 layers into one composition in Composure.
I encountered two major problems; firstly chroma key doesn't seem to work properly when two video plates are used. And secondly is getting all the layers to stack and display properly.

Separating the food cart. Following this tutorial - www.youtube.com/watch?v=QojUd7Btmng - I was able to separate all the elements of the food cart into a separate layer that can be assigned to a new cg_element in the composure panel.

Opening the layer window.

Adding the actors to a new layer labelled 'FoodCart'

Creating a new element in composure,
and then adjusting the input in the details panel to create a 'FoodCart' Layer.
Fog effects should also be turned off.


In order for this layering to work, adjustments to the material were also needed.

I nested over nodes to form a stack of layers, combining the layers below with a new upper layer.
It was at this point I started to notice that the video layers chroma key was not working. I had separated out and exported both video layers onto a solid red background and adjusted the chroma key to remove red, but all I was seeing in the Unreal output was the top layer with the red retained.


It was at this point I decided to forego the chroma key stage to narrow down the issue, and created fresh video layers with an alpha channel.

This did improve things. I was now able to see up to two layers displayed at once, the 2nd and 3rd layers. The foreground would still mask the layers completely, and the background video layer would mask the camera.
Each layer would display fine on it's own in the composure preview, but combined would not work.


I suspect that these issues are either from having a combined material for all the compositing - Although I have seen examples of it working with three layers online.
Or that when using more than one video layer that you should not use a media plate layer as the parent layer in Composure.
Overall I found this process and workflow tedious and restricting. You have less control over your layers, software like After Effects allows you to target specific regions of the image with effects with masks or precomps.
I think that this workflow is mostly useful for live production with a linked virtual camera. I do not see it as an easy tool to produce a high quality final image.


Comments